Glorious thick slices and a wonderful crispy crust. Making homemade bread takes time, but the extra effort is so worth it. A low carb diet? I couldn’t do it. I love bread too much for that. Want to know how to make homemade white bread? Keep on reading, because I’m telling you all about it! Step by step. Find your no-nonsense white loaf recipe here!
Why did I start making this white loaf recipe?
It is not just the tasty-ness of homemade bread that caused me to make it. Necessity and the desire to learn something new played a big role too! We live in the countryside and the road to civilization is a hilly and rugged one.
I wanted to have the possibility to make bread when we’ve run out. We sometimes get stuck here because of slippery roads and we’re not always keen to head off to the nearest shop! So I always made sure to have those useful ‘ready make bread’ sachets from the Aldi. All I needed to do was to pop the content of that sachet into my bread maker with some water and voila, we had bread.
But a desire to be able to make bread from scratch kept lingering and when my bread maker broke, I knew it was time to learn and I wanted a simple and no-nonsense white loaf recipe to use.
But, enough about me, lets get started!
There will be a printable at the end of this post. Want to see the printable straight away? Jump to Recipe.The things you’ll need

Start by making sure you have these things ready to go:
– 700 grams of plain flour
– 2 level teaspoons of dried yeast
– 10 grams of unsalted butter (and just a tiny little bit more to butter the loaf tin)
– 1 level teaspoon of granulated sugar
– 1 level tablespoon of salt (or less according to taste)
– a 2 lb loaf tin (or two 1 lb (450 gr) ones)
– an ovenproof dish
– a measuring jug
– a big enough a zip lock bag for the tin to fit in (I just use a toilet bin bag and that works just as well)
– a big bowl
– a sieve
– a wooden spoon
– a weighing scale
– a little bit of oil to oil the inside of the zip lock bag (not pictured)
Then preheat the oven to 110 degrees celsius.
Making the yeast mixture

Measure 75 ml of boiled water.

Add 75 ml of cold water to that. This is now ‘hand-hot’ water.

Then add the teaspoon of granulated sugar to the hand-hot water and make sure to stir it with a fork until all of the sugar has dissolved.

Sprinkle the two teaspoons of dried yeast over the water like a fairy.

This is my partner in crime when it comes to bread. I keep it in the fridge and it has never disappointed me! You can buy it in the Tesco.

You’ll want to stir the water a bit with a fork to mix the yeast with the water, but no worries if it isn’t completely mixed. It will do the job!
Starting the dough

Measure the 700 grams of plain flour and put it into the ovenproof dish (or do it both at the same time, win win!). Then put the dish in the preheated oven and leave it in there for ten minutes.


When the ten minutes are up, make sure to sift the flour into the bowl. Be careful when handling the dish, because it will be quite hot!

Again sprinkle the salt over the flour as if you are a fairy!

Do you remember that little baby stick of butter? You’re going to need it now! Rub the butter in the flour.

Make a well in the middle of the flour.

The yeast mixture should look something like this by now! Nice and puffy.

Now pour that yeast mixture into the well. This is where the magic is going to happen..

BUT before you start mixing, add some more hand-hot water (138 ml boiled and 138 ml cold water) as well.

Grab that wooden spoon and use it to mix everything up. I usually make clock wise movements in the beginning (from 12 o clock to 9 o clock) and then when the dough is becoming a bit more firm I start to go all over the place.
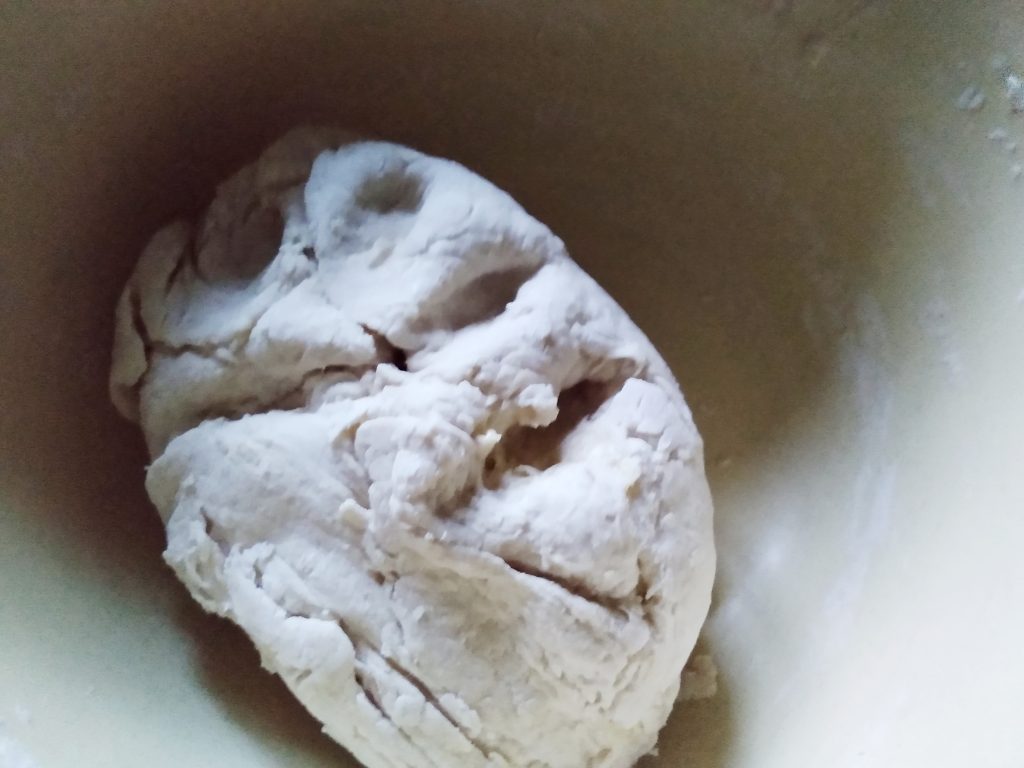
In the end make sure to use your hands. Use the ball of dough to get all the bits and bops of flour and dough off of the bowl. Really make sure that there are no clumps of dough or bits of flour left on the bowl. Leave no man behind!
Kneading the dough
This is the bit that I found tricky when just beginning. Luckily my Delia Smith’s Complete Illustrated Cookery Course book explained it very well. Mine may be falling apart since Nathan’s grandmother gave me hers, but boy has it been useful! In order to explain it to you, I took my husband hostage and asked him to make pictures while I am doing it.

Firmly hold the bottom part of the dough with your one hand. While you use the heel of the other hand to stretch the rest of the dough away from you. You’ll want to go as far as possible without allowing the dough to rip.

Then fold the top part of the dough towards the middle.

And fold the bottom part of the dough to the middle as well and let it rest on top of the other half. Basically imagine a little invisible baby that you are trying to wrap up nicely with the dough.

Then rotate the little package of dough a quarter clockwise.

And repeat the process! Do this for about ten minutes. Make sure to really keep an eye on the clock, because it is very easy to think that you have been doing it for ten minutes, while you have been only going at it for five minutes!

This is what the dough will look like in the end. Make sure to put it back in the big bowl that you used for mixing the dough and put some clingfilm over the top of the bowl.
The rising process
Leave the dough for 1,5-2 hours at room temperature or 45-60 minutes in a warm place. A colleague of mine (thank you Liz!) gave me the tip to put the bowl in our airing cupboard. That has worked brilliantly for me! I leave it in there for one hour.

After the first rising round, the dough should have almost doubled in size. Take the dough out of the bowl, knock the air out of it and repeat the kneading method I described before. Knead for five minutes. When knocking the air out of the dough, you’ll want the dough to become the same size it was before the first rising round!
Use a bit of extra butter now to butter the inside of the loaf tin. I use a piece of kitchen tissue to make sure that all corners and bits are covered!
Then pat your dough into an oblong and put it into the loaf tin. What is an oblong you say? Well sir or madam that’s a very good question! I have to be honest that I myself had no clue. Well apparently this. is. it.

Sprinkle a little bit of flour over the top of the dough which is now comfortably nestling in the loaf tin.


Then put it into an oiled zip lock (or if you are going Jenna-style, a toilet bin bag) and close it off with a clip or knot. It is now time for the second rising round. This will take 30 minutes in a warm place (which isn’t our house, o no no, the struggles of a house only heated by wood burners). Or an hour at room temperature (still not our house, the airing cupboard is the dough’s refuge). You’ll want the dough to do a nice peek-a-boo above the edge of the tin.
Baking the bread
In the meantime make sure to pre-heat the oven to about 200 degrees Celsius. I have seen recipes in which it is said to bake the bread at 220 degrees Celsius. I have, however, noticed that if I bake at 220 degrees, the bread gets too dark on top while being under cooked on the inside. The decision depends on your oven. If you want to play it safe, go for 200 degrees. If you like to live dangerously, go for the 220 degrees. But for the daredevils amongst us, make sure to keep an eye on that top! You may need to cover the top with kitchen foil somewhere along the way to make sure that it doesn’t burn.
Bake the loaf for 35-40 minutes. I make sure not to open the oven until at least 20 minutes have passed. You’ll want your bread to sound hollow. To check this, take the bread out of the tin and tap on the bottom of the bread. If it doesn’t sound hollow after those 35-40 minutes, you may want to cover the top of the bread with kitchen foil and bake it in ten minute intervals.

The cooling process

When your bread is done, make sure to cool it on a wire rack. Don’t cool the bread on a flat surface, because the bottom will become soggy. If you have watched the Great British Bake Off, then you’d know that Paul Hollywood would not approve of any soggy bottoms.
To leave the bread be is a tricky bit. If you are a bit like me, you’ll want to slice that bread and start eating it, but please resist. the. temptation! Apparently the cooling down process is in fact the cherry on the pie. The warmth of the bread will rotate within the crust of the bread and sort of… dry it? If you slice the bread too early, the inside of the bread will still be dough-y. It would ruin all that hard work! The cooling process allows the bread to become airy.

And voila, now you know everything you need to know on how to make homemade white bread.
I hope this post will be useful for anyone who wishes to start making homemade white loafs as well. I’m only a beginner in this homemade bread journey, so I’m sure there may be useful things that I am missing. Let me know if I am!
Much love,
Jenna
Useful Links
- Delia Smiths Online Cookery School, Bread for beginners. Do you prefer video’s explaining how to make bread? Delia Smith published some brilliant video’s in her Online Cookery School! See them here.
- Want to understand a bit more why certain ingredients are needed for bread and what they do? The Spruce Eats has a good explanation! See it here.
- Did things not go well and would you like to find out why? The Tips & Troubleshooting from Red Star Yeast might offer you a solution. See it here.
- Would you like to make white bread, but would you like it to be even simpler? Fun Cheap or Free has a recipe which requires less steps! Make sure to keep in mind though that her recipe uses Fahrenheit, so think 176 degrees Celsius instead! See the recipe here.

Homemade white bread
Ingredients
- 426 ml hand-hot water
- 1 tsp granulated sugar
- 2 tsp dried yeast make sure the teaspoons are leveled
- 700 gr plain flour warmed slightly by putting in oven for 10 min at 110 degrees celsius. make sure to have a little bit of extra flour on the side.
- 1 tbsp salt or less to taste
- 10 gr unsalted butter make sure to have a little bit of extra butter to butter the loaf tin
- oil you'll need this to oil the inside of the zip lock bag
Instructions
- Pre-heat the oven at 110 degrees Celsius.
- Measure 150 ml of the hand-hot water into the measuring jug. Then add the granulated sugar and whisk it with a fork until the sugar has dissolved. Next sprinkle the yeast over it and whisk it just a little bit with a fork. Set it aside.
- Measure 700 grams of plain flour into an oven proof dish and put the dish in the oven for 10 minutes. After that, sieve the flour into the mixing bowl. Sprinkle the salt over it and make a well in the middle. The yeast mixture should be nice and froth-y by now. Pour the mixture and another 226 ml of the hand-hot water into the well.
- Begin to mix it to a dough with a wooden spoon and, when it gets very firm, with your hands.
- Make sure to leave no bits and bops behind on the bowl and then put the dough on a flat surface. Knead the dough for 10 minutes.
- Now put the dough back into the mixing bowl and put clingfilm on top. It is now time for the first rising round. This will take 1,5-2 hours at room temperature or 45-60 minutes in a warm place. You want the dough to almost double in size. Butter the inside of the loaf tin and oil the inside of a big zip lock bag (one that will loosely fit around the loaf tin) during this time.
- Take the dough out of the bowl and put it on a lightly (!) floured surface. Knock the air out of the dough until it is the same size as before the first rising round. Knead it for another 5 minutes. Now pat the dough into an oblong and put it into the bread tin. Sprinkle a bit of flour on top and put the zip log bag around it. Make sure to use a clip or a knot to close off the zip log bag. It is now time for the second rising round. This takes 1 hour at room temperature or 30 minutes in a warm place. Meanwhile make sure to pre-heat the oven at 200 degrees Celsius.
- The dough is now done with rising! Bake the loaf for 40-50 minutes. I don't check on the bread until at least 20 minutes have passed. Each oven is different, so it's possible to do checks in between to see if the loaf sounds hollow when tapping the bottom. Does the top start to brown too much, but the inside doesn't sound hollow? Cover the top with silver foil and keep baking the bread in 10 min intervals. Once the bread sounds hollow, make sure to cool it completely on a wire rack.