
If you don’t have a fancy Canon camera and you depend entirely on your mobile phone to take photos for your business, blog, or social media (I feel you, I’m in the same boat!). Then it helps to have good mobile phone photography skills. Because attractive and professional-looking photos draw your target group to YOUR content rather than all the other content that’s out there. Read on to find 4 simple tips that will help you to improve your mobile phone photography skills.
Last week I discussed 4 free blogging tools for beginners. It’s insane to realise and even more insane to say it but… I have blogged for over 10 years. And along my blogging journey, I have learned a few useful things. Things that seem so obvious now but definitely weren’t a few years ago!
You could say that I have gathered previous bits of knowledge that I wished a mentor would have shared with me. It would have saved me many errors, a lot of effort, and a lot of time. Although I do have to admit that there is something super satisfying about doing the research, putting in the work, and seeing your skills and output improve.
Some of you mentioned on Instagram that you’d like me to share some of those precious bits of knowledge and it’s my honour to take you under my ‘mentor-wings’. I want to make things easier for you. In case you want to skip the research process and just want to improve those photos STAT. Because nothing is as frustrating as writing superb content and then feeling that the accompanying photos don’t do it any justice!
MOBILE PHONE PHOTOGRAPHY TIPS
When I take a look at some of the photos that I shared on the A Hopeful Home Instagram over a year ago, I cringe. A lot of the photos on my personal Instagram are even worse. Especially the food photos. Eek!
These days I wouldn’t call myself a ‘mobile phone photography professional’. There is still a lot left to improve. But there are a couple of basics that I’ve learned and I can’t wait to share them with you.
When you have a go at these easy-to-implement basics, your pictures will already immensely improve. I know they have for me. To show just how much of a difference implementing these tips can make. I’ll be showing some of my older Instagram posts (examples on how NOT to do it) next to newer Instagram posts (examples where I have implemented these exact tips).
1. AVOID ARTIFICIAL LIGHT
When it comes to mobile phone photography, one of the best things that could have happened to me, was to stumble upon this tip. Avoid artificial light (unless you have fancy photography lights) and actually… also avoid using the flash of your smartphone as much as possible.
This tip feels very counterintuitive. We want the objects in photos to be clearly visible. So of course you would make sure to turn on as many lights (or just one major one, like the one above your dining table, to function as a ‘spotlight’) as possible, right?
Wrong. Artificial light gives off a yellow or white glow and it can make shiny objects even shinier (in a negative way). The glow will dominate so much that those beautiful natural colours will not be optimised or even visible in a photo. And those highlights that you sometimes see on objects in photos? There would be more (because there are more light sources) and they would be brighter. Which often isn’t what you want.

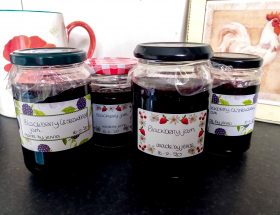
The Instagram post shown above is an example of just how much artificial (white) light can negatively influence a photo. And the highlights on the ziplock bags on the left show just how extreme the highlights in a photo can get when you use artificial light.
The flash of your smartphone could sometimes be used during the day when you want to minimise the shadows in a photo. But other than that, it’s recommended that you don’t use your flash. So you really want to use the natural light in your home (or outside). Like I did in the Instagram post underneath.

When I had just read this tip and started to implement it. I would regularly turn off all the lights in our home and walk around the house at different times. It’s a great way to see where the ‘good spots’ are.
After a while, you’ll start to notice that for example there’s a lovely soft light on the windowsill of your office until two o clock. Or you’ll find that when you move your dining table a little bit you’ll catch that light on the wall above it in the late afternoon. Or your kitchen counter could be a great spot light-wise until dinner time. When you get creative, you’ll be able to get that great lighting to make high-quality photos and it doesn’t cost you a dime!
Don’t let the dark feel of photos caused by a lack of artificial light scare you. My last tip will deal with this!
2. OVERCAST DAYS ARE YOUR FRIEND
Once you start to get a grip on the ‘good light’-spots in your home, there will be something else that you’ll notice. Your photos won’t look as well when you take them in direct sunlight. That ‘good light’-spot above your dining table might work a lot better later in the day. Than in the early morning when the sun beames through your dining room window. Overcast days are your friend.
Direct sunlight could cause high contrast, the highlights could be all wrong, the colours in the photo could be influenced negatively, or the lens could flare. The Instagram post underneath is an example of how much your lens could flare when taken in direct sunlight. That flare is great if that’s the effect you’re aiming for but often it’s ruining your photos!

To take a good photo in direct sunlight is hard. Don’t get me wrong, there are ways to make direct sunlight work for you. One major tip that various articles mention for when you just can’t avoid taking pictures in direct sunlight, is to look for some shade. Whether it be under a tree, self-created by using an umbrella, or simply by waiting for a cloud to cover the sun.
This article focuses on taking photos with an iPhone in the sun but I’d say that the tips mentioned are useful for all types of smartphones.

The Instagram post above is a great example of a sunny day where, because of a cloud momentarily covering the sun, I still managed to take a clear photo.
3. DON’T ZOOM IN
Has it ever happened to you that you want to take a photo of something but you’re not close enough? And instead of walking closer to the object, you take the lazy way and zoom in on your camera?
Avoid this when you can! I say when you can because of course there are sometimes situations where you see a cute lamb and you HAVE to take a photo of it and you don’t want to frighten it. Fair play. That’s exactly what occurred in the Instagram post below but you can clearly see that using the zoom-in function had a negative impact on the quality of the photo.

So when you can, please avoid the zoom-in function of your camera. Because it will affect the quality of your photo immensely. This may sometimes mean that you’ll have to get close to sleeve nibbling pigs but if that gets you a high-quality shot it will be worth it! Like in the Instagram post below.

4. GET A GOOD PHOTO EDITING APP
If I had to compare these four tips to a pie, then this tip would be the cherry on top! Do this wrong and you might undo all the effort that you put into taking good photos. You have to get a good photo editing app. And you need to take the time to get used to that app to edit your photos in a way that enhances them.
The good news? I have found an app that’s free. Adobe Lightroom is a brilliant app that I’ve been testing and using for the past six months. I had been on the hunt for a new photo editing app. Since I discovered that the previous app that I used actually decreased the quality of photos when I edited them! Yes, some apps do that! Talking about going backwards…
Initially, the app takes a bit of figuring out. There are a lot of settings that you can play with and you need to get a feel of what you’d like your photos to look like. With me, the edits are usually quite subtle. But once you have figured it out, it won’t take you more than 5 minutes to edit your photo. If even that!

LET’S GET SUPER SPECIFIC
So how do I edit photos in the Adobe Lightroom app?
- I start with the ‘Light’ settings and literally work my way down the list. Except for the ‘contrast’ setting there. I skip that one and leave it for last. This is a tip someone mentioned and it has made a huge difference for me!
I just move the sliders to the left and right and pay attention to the effect it has on the photo. Do you remember the ‘dark feel’ of photos without artificial light that I mentioned in tip 1? The ‘exposure’ setting will be a huge help for that. The exact numbers of the settings very much variate per photo but just to give a guideline. The exposure and highlights often end up on the right side (of the middle, so a positive number). And the shadows, whites, and blacks often on the left (so a negative number).
When you adjust these settings, you might want to keep in mind what you want to use the photo for. If you use it for Instagram, the photos often seem darker or less clear when they are small. The Planoly app is a brilliant way to check what a photo looks like on your Instagram before you even post it! I discuss this app a bit further in my 4 free blogging tools for beginners-post.
- After having edited the ‘Light’ settings, I move on to the ‘Detail’ settings. All I touch here is the ‘sharpening’ setting. To prevent a photo from looking grainy, I usually don’t go higher than 50.
- Then I move to the ‘Effects’ setting. Here I only play around with the ‘clarity’ setting. 30 is the highest I’ll go. I find that the colours start to look a bit unnatural and harsh once you go higher.
- If you had one of those unavoidable situations where you had to use some artificial light. Then the ‘Color’ settings will be really useful. You can play around with the settings there to get rid of a yellow glow. Or you might want to add some warmth because you used white artificial light. But usually, I skip the ‘Color’ settings.
- NOW it is time to head to the ‘Light’ settings again to adjust that ‘contrast’ setting. It will really strengthen the colours in your photo. The reason why I use this setting last is because you want to have all those shadows and highlights etcetera sorted before you apply this setting. I didn’t know this for a long time and once I did, I noticed a huge difference in my photos!
Do you want to do some further research on how to edit photos in Lightroom? Then this article might be useful for you. It lists 51 free tutorials. Some of the tutorials focus on the paid version of Lightroom but a lot of them are still super helpful!
There you have it friends. My 4 tips to improve your mobile phone photography skills. I hope they are helpful and if you have any good tips, definitely feel free to share them!
Much love,
Jenna